 In these times of exponentially growing data, visualization is a necessary skillset to have in your tool box. Popular techniques include bar charts, line graphs, pie charts, and bubble maps among others.
Building interactive charts from scratch with JavaScript can be a difficult endeavor for any developer, especially someone starting out new. That is exactly why we have JS charting libraries which make it much easier and quicker to conjure up insightful visualizations!
Read on to see how I create a JavaScript Bubble Map with one of these libraries.
JavaScript Charting Libraries
There are quite a few great JavaScript libraries available to use and each one of them has its own pros and cons. But the best part is that the process of building charts with all of them is mostly similar. So, you can learn the ropes with any one and then use whichever library suits your requirement for a particular project.
I have decided to use AnyChart JavaScript Library for creating bubble maps along with this tutorial. I think it is a great choice for developers with novice to intermediate level of coding skills. AnyChart is flexible with extensive documentation and has a variety of chart types to kick start your visualization journey.
What Is Bubble Map and What Will It Show?
I know you are excited to start creating the visualization but before we begin, it is important to understand the chart type and why it is a good fit for what we want to show.
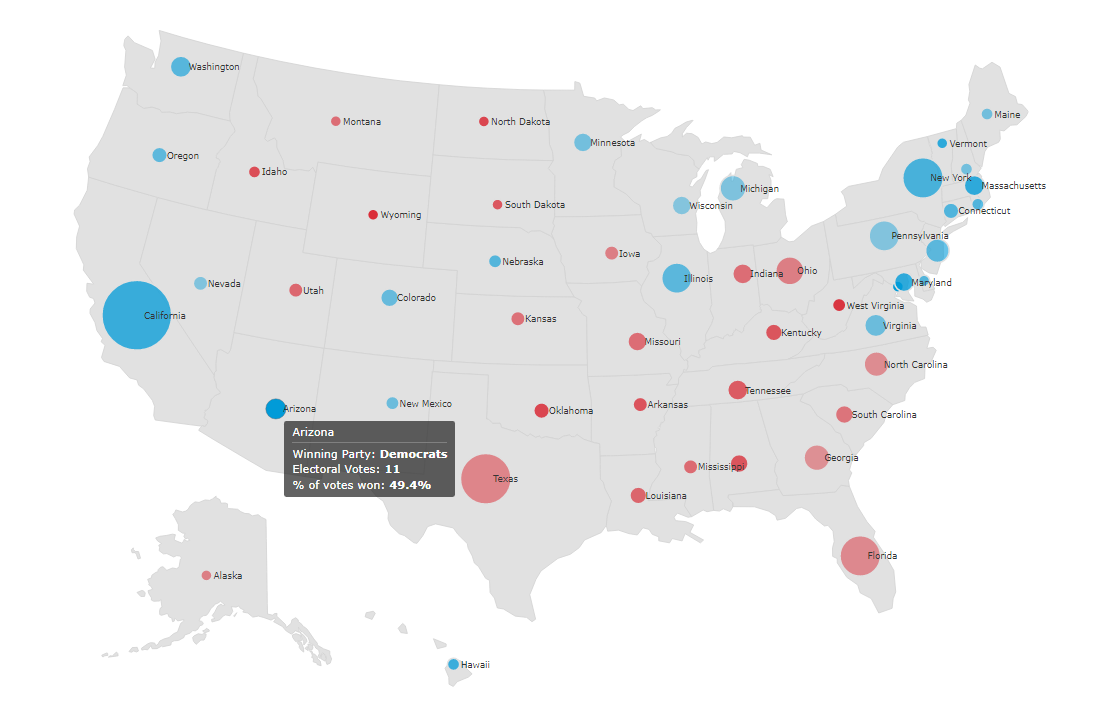
A bubble map is essentially a combination of a bubble chart and a map where the bubbles are plotted over geographical regions. The size of the bubble indicates the value of the particular variable, with the position on the map indicating location.
One of the most important events of 2020 was the US presidential election. Of course, we know the overall outcome. But wouldn’t it be interesting to see who won in which states and by what percentage — all in just one view? I certainly think so! While I’m sure many of us have seen a lot of 2020 US election maps, I will create my own and show you how, step by step!
I am going to use the bubble map chart where I will plot the bubbles over each American state. The 3 indicated parameters will be as follows:
- The number of electoral votes for each state, by the bubble size.
- The winning party for each state, by the bubble color.
- Percentage of votes won, by the color opacity.
As you can see, the superpower of a bubble map chart is the ability to show multiple parameters in a single viz.
Creating Bubble Map with JavaScript
Now that you know what a bubble map is and hoping that you are convinced about it being the right chart to represent state-wise results of the US Elections, let’s dive into the process.
1. Create a basic HTML page
The initial step is to create a blank HTML page. To hold my chart, I add a div element with a unique id that I will use to reference it later.
I set the width and height of the placeholder div to 100% so that the chart is displayed over the entire screen. You can keep these values as per your preference.
<!DOCTYPE html>
<html>

<head>
  <title>Bubble Map</title>
  <style>
    html,
    body,
    #container {
      width: 100%;
      height: 100%;
      margin: 0;
      padding: 0;
    }
  </style>
</head>

<body>
  <div id="container"></div>
</body>

</html>
2. Include the necessary script
The next step is to link the appropriate JS scripts that will be used to create the bubble map. Since I am using the AnyChart library, I will reference the corresponding files. For my chart, I need to add AnyChart’s Base and Geo Maps modules. I also need to include the file that has the geodata for the US states which is also available in the library’s CDN.
Just to remind you, all the script files need to be included in the <head> section of the HTML page.
<script src="https://cdn.anychart.com/releases/8.9.0/js/anychart-base.min.js" type="text/javascript"></script>
<script src="https://cdn.anychart.com/releases/8.9.0/js/anychart-map.min.js" type="text/javascript"></script>
<script src="https://cdn.anychart.com/releases/8.9.0/geodata/countries/united_states_of_america/united_states_of_america.js"></script>
3. Connect the data
There are a ton of datasets available for the US election results. For this chart, we need specific fields so I had to create the final dataset by combining data from multiple sources. I used the dataset about the number of electoral votes per state from The Library of Congress site and the winner data from The Associated Press.
The AnyChart library supports many data formats, including CSV, JSON, XML… To make things simpler here, I have pre-processed the data to include relevant fields for our chart which are as follows:
- State code
- Latitude
- Longitude
- State name
- Number of electoral votes
- Winning party
- % of votes won
You can download the JSON file here.
Before we start using the data, we will need to include 2 more script files to our HTML page. The Data Adapter module handles the loading of the data file, so we include that. Since we are creating a map, we will make use of another JavaScript library — Proj4js — which transforms point coordinates from one coordinate system to another. In simple terms, it will take care of plotting the bubbles over the respective geographical areas.
4. Add the code to draw the chart
Now that the preliminaries are over, it is time to get to the main part. The great part about using JavaScript charting libraries is that the amount of code one has to write can be really small. I will walk you through the lines of code so that you have a better understanding of how the bubble map is drawn.
Firstly, I will make sure that all the code for creating the chart is inside the anychart.onDocumentReady() function. This is to have the page fully loaded before anything else is executed. Next we load the data using anychart.data.loadJsonFile() function.
I create the map first, define some settings for it, and set the geodata. I also add a title to the map.
anychart.onDocumentReady(function () {
        anychart.data.loadJsonFile(
          'https://gist.githubusercontent.com/shacheeswadia/70ec3d69e0e7a8bff7917607ea2926e4/raw/c3329fa81e86d9e637503b042becd17e68d9a718/bubbleMapData.json',
          function (data) {

            // Creates map chart
            var map = anychart.map();

            // Define settings for maps regions
            map
              .unboundRegions()
              .enabled(true)
              .fill('#E1E1E1')
              .stroke('#D2D2D2');

            // Set geodata using the script added
            map.geoData('anychart.maps.united_states_of_america');

            // Set Chart Title
            map
              .title('2020 US Election Results');

        });
      });
Next, I will add the bubbles over the map. Since tiny bubbles would not be visible well and very large bubbles would create a messy overlap, I set a minimum and maximum bubble size.
// Set bubble min/max size settings
map.minBubbleSize('0.8%').maxBubbleSize('5%');
Now, since we want to show the election results, we need to indicate the winner for each state by the winning party color — blue for Democrats and red for Republicans. For this we check the winner in the data and assign the fill attribute with the corresponding color.
// Fill color based on the winner
data.forEach(function(d){
  if(d.winner == "Democrats"){
    d.fill = "#019bd8";
  }else{
    d.fill = "#d81c28";
  }
});
I then plot the bubbles according to the data and set the size of the bubble to reflect the number of electoral votes from the data. I enable the default tooltip and labels for the bubble chart with a bit of styling.
The final steps are setting the container to reference the previously added HTML block element and drawing the chart.
That’s it — a beautiful, fully functional, interactive bubble map is ready with just these few lines of HTML and JS code!
You can check out this initial version on CodePen [or on Playground]. For your convenience, here is the complete code:
<!DOCTYPE html>
<html>
  <head>
    <script src="https://cdn.anychart.com/releases/8.9.0/js/anychart-base.min.js" type="text/javascript"></script>
    <script src="https://cdn.anychart.com/releases/8.9.0/js/anychart-map.min.js" type="text/javascript"></script>
    <script src="https://cdn.anychart.com/releases/8.9.0/geodata/countries/united_states_of_america/united_states_of_america.js"></script>

    <script src="https://cdn.anychart.com/releases/8.9.0/js/anychart-data-adapter.min.js"></script>
    <script src="https://cdnjs.cloudflare.com/ajax/libs/proj4js/2.3.15/proj4.js"></script>

    <style type="text/css">

      html,
      body,
      #container {
        width: 100%;
        height: 100%;
        margin: 0;
        padding: 0;
      }

    </style>
    </head>
    <body>

    <div id="container"></div>

    <script>

      anychart.onDocumentReady(function () {
        anychart.data.loadJsonFile(
          'https://gist.githubusercontent.com/shacheeswadia/70ec3d69e0e7a8bff7917607ea2926e4/raw/c3329fa81e86d9e637503b042becd17e68d9a718/bubbleMapData.json',
          function (data) {

            // Creates map chart
            var map = anychart.map();

            // Define settings for maps regions
            map
              .unboundRegions()
              .enabled(true)
              .fill('#E1E1E1')
              .stroke('#D2D2D2');

            // Set geodata using the script added
            map.geoData('anychart.maps.united_states_of_america');

            // Set Chart Title
            map
              .title('2020 US Election Results');

            // Set bubble min/max size settings
            map.minBubbleSize('0.8%').maxBubbleSize('5%');

            // Fill color based on the winner
            data.forEach(function(d){
              if(d.winner == "Democrats"){
                d.fill = "#019bd8";
              }else{
                d.fill = "#d81c28";
              }
            });

            //Charting the bubbles
            var series = map.bubble(
              anychart.data.set(data).mapAs({ size: 'electoralvotes' })
            );

            // Tooltip
            series
              .tooltip(true)
              .stroke('2 #E1E1E1')
              .fill('#1976d2')
              .selectionMode('none');

            // Labels
            series
              .labels()
              .enabled(true)
              .anchor('left-center')
              .position('right')
              .fontSize(11)
              .offsetX(5);

            // Set container id for the chart
            map.container('container');

            // Initiates chart drawing
            map.draw();

        });
      });

  </script>
  </body>
</html>
Customizing Bubble Map
JS charting libraries usually provide a range of pre-built customization options.
The existing bubble map is already great but we can tweak it with just a bit of more code and make it more insightful, aesthetically better and improve the information shown.
A. Assign opacity based on the winning vote percentage
It is always a good idea to showcase maximum information in one view without adding too much complexity. So I want to add one more aspect to the visualization by representing the percentage of votes won with the opacity of the bubble color, and it will be a great opportunity to show you how it is possible to involve a different JavaScript library in the process if you need some certain functionality from it.
I will take D3.js, a famous open source JS library for data graphics, and use it to create a linear scale that would accept the value of the percentage of the votes from data and return the corresponding opacity value. For this, I add the required D3 scripts and then add the code to make the scale. I adjust the input and output values according to the data. Lastly, I add the opacity value to the fill attribute.
// Linear scale to get opacity values
var opacity = d3.scaleLinear()
              .domain([49, 70])
              .range([0.4, 0.9]);

// Fill color based on winner and opacity based on % of votes won
data.forEach(function(d){
  var opacityVal = opacity(d.votepercent);
  opacityVal = opacityVal.toFixed(2);
  if(d.winner == "Democrats"){
    d.fill = "#019bd8 " + opacityVal;
  }else{
    d.fill = "#d81c28 " + opacityVal;
  }
});
Don’t get overwhelmed if you don’t fully understand this part. It is slightly beyond the beginner level but still can be helpful to many and it’s not too complicated, you see.
View on CodePen
[View on Playground]
B. Improve the tooltip
The default tooltip just shows the state name with its latitude/longitude and value that corresponds to the number of electoral votes for each state.
We can customize the tooltip to display the information that we want to show — something bit more meaningful.
For each state, I decided to show the winning party name, the number of electoral votes and the percentage of votes won by the winner. Since I want to show multiple fields, I enable HTML for the tooltip that would allow me to format the text. I then add all the information in HTML format and modify some styling. Ah, now the tooltip feels like a constructive supplement to the bubble map visualization.
// Enable HTML for labels
series.tooltip().useHtml(true);

// Customize tooltip text
  series
    .tooltip()
    .titleFormat("<h6 style='font-size:16px;margin: 0.2rem 0; font-weight:400;'>{%name}")
    .format("<h6 style='font-size:14px; font-weight:400; margin: 0.2rem 0;'>Winning Party: <b>{%winner}</b></h6><h6 style='font-size:14px; font-weight:400; margin: 0.2rem 0;'>Electoral Votes: <b>{%electoralvotes}</b></h6><h6 style='font-size:14px; font-weight:400; margin: 0.2rem 0;'>% of votes won: <b>{%votepercent}%</b></h6>");
C. Enhancing the overall appearance of the chart
Just some last, simple modifications to enhance the chart. I add a subtitle for the chart with some styling and change the label colors to give it a bit more contrast.
One last thing I adjust is the color of the bubbles when hovered over them.
Voila! We have an enthralling and effective, JavaScript based bubble map visualization to showcase the US election results data by state!
View on CodePen
[View on Playground]
Conclusion
As you see, it is easy and exciting to create interactive data visualizations like bubble maps using a JavaScript library. You can look into other JavaScript charting libraries and find out more about each of them.
I hope this tutorial has gotten you interested in data visualization and made you excited to start exploring JavaScript charts. Please feel free to ask any questions, offer suggestions or drop a comment. All in all, don’t wait to start creating beautiful, useful visualizations!
Published with permission of Shachee Swadia. Originally appeared on Hacker Noon under the title “How to Create a Bubble Map with JavaScript to Visualize Election Results: A beginner level tutorial to get started with data visualization by creating an interesting and intuitive JS bubble map” on December 30, 2020.
Check out other JavaScript charting tutorials.
If you want to write a compelling guest post for our blog get in touch.
- Categories: AnyChart Charting Component, AnyMap, Big Data, Charts and Art, HTML5, JavaScript, JavaScript Chart Tutorials, Tips and Tricks
- No Comments »