 Scatter plots are a great way to visualize data. Data is represented as points on a Cartesian plane where the x and y coordinate of each point represents a variable. These charts let you investigate the relationship between two variables, detect outliers in the data set as well as detect trends. They are one of the most commonly used data visualization techniques and are a must have for your data visualization arsenal!
In this tutorial, I will teach you how to build your very own interactive scatter plot charts using JavaScript.
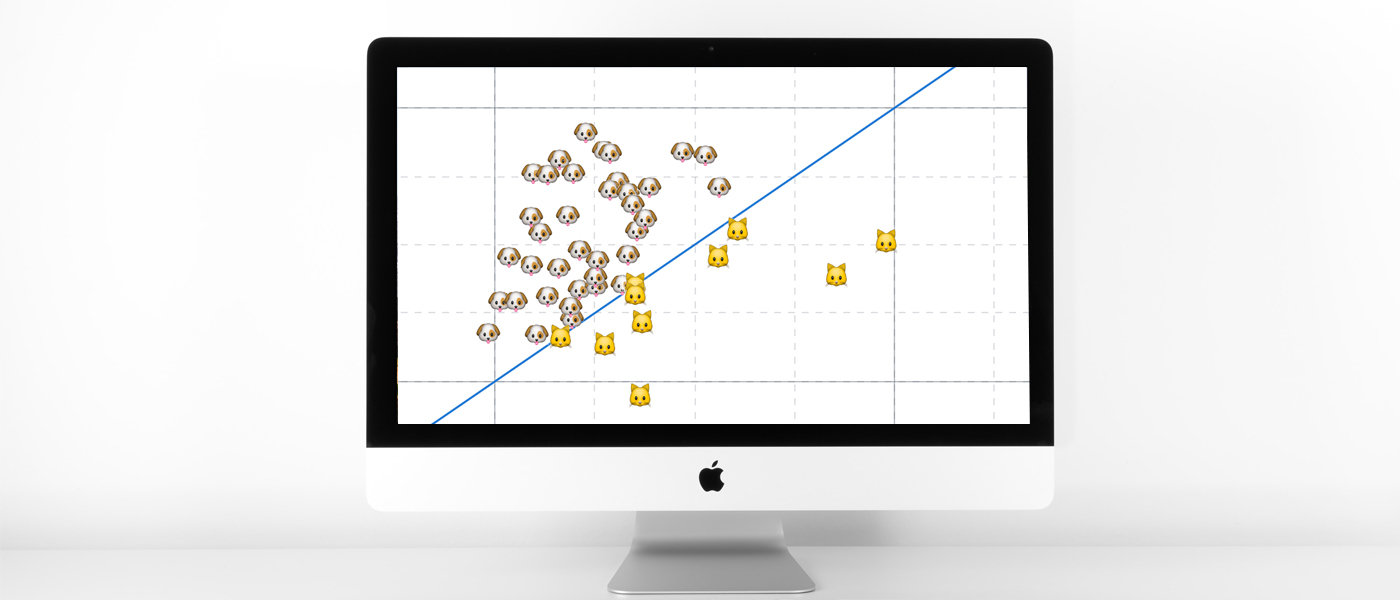
Ever wondered whether the population of the United States of America were dog people? Well, you’re about to find out! To help you learn more about building scatter plots I will be using the Cat vs Dog Popularity in US dataset. This dataset contains the percentage of homes with dogs and cats for each US state.
How to Create JavaScript Scatter Plot
Building data visualizations can often be an overcomplicated endeavour (just ask anyone who uses Matplotlib), but if you use the right tools it can be quick and painless! There are many JavaScript libraries out there which can help you do this, they each have their own advantages, disadvantages and choosing the right one really depends on your use case and coding ability.
For this tutorial I have chosen to use AnyChart JavaScript library. I think AnyChart is perfect for newcomers to data visualizations and is good for both newbies to more intermediate coders. It’s really easy to get something up quickly and with little coding knowledge, however there is also a lot of room for customization. Plus, their documentation really holds your hand through the entire process.
1. Create an HTML page
The first thing I need to do is set up my html page.
<!DOCTYPE html>
<html>
  <head>
    <title>JavaScript Scatter Chart</title>
  </head>
  <body>
    <div id="container" style="width: 100%; height: 500px"></div>
    <script>
      // code for chart goes here.
    </script>
  </body>
</html>
I create a blank page and then include a div element for the chart. I give this div the id ‘container’ so I can easily reference it later. I also include style properties to ensure the div fills the entire page. (You can easily change this to suit your own use case).
2. Add the necessary scripts
Next up I add the necessary scripts. Because I am using a JavaScript library to help me build this chart I need to include the necessary scripts. These scripts will depend on which library I use and in this particular case I need to add AnyChart’s ‘base’ and ‘data-adapter’ modules. The base module contains the charting library while the data-adapter module will allow me to load my data.
<script src="https://cdn.anychart.com/releases/8.7.1/js/anychart-base.min.js"></script>
<script src="https://cdn.anychart.com/releases/8.7.1/js/anychart-data-adapter.min.js"></script>
3. Loading the data
As mentioned above, I will be demonstrating how to build a scatter plot by visualizing the Cat VS Dog Popularity in US dataset. This dataset is available at Data.world which is a website dedicated to datasets. Data.world refers to itself as a data ‘catalogue’ and allows you to explore other users’ uploaded data as well as host your own. I’d encourage you to check this site out as it is a rich resource for anyone looking to visualize data.
Different charting libraries will have different requirements for how they need their data presented. In our case AnyChart allows a number of data formats (JSONs, CSVs, Google Sheets etc) but requires the data be presented in a particular format. They need the x-axis variable to be named ‘x’ and the y-axis variable to be named ‘value’.
To make this tutorial easier to follow I’ve done all the pre-processing required (renamed columns and dropped unused columns) and made the resulting CSV available for download: here.
4. Drawing the chart
Finally, with my page made and data ready, I can finally get to the fun part: drawing my chart.
I will be placing the code for drawing my chart within the anychart.data.loadCsvFile and that within the anychart.onDocumentReady() function.
These functions are asynchronous. Usually code is read and executed linearly but in some cases these functions take time. Uploading and parsing a CSV for example takes time.
So by placing my code to draw my chart within anychart.data.loadCsvFile I am ensuring that the code to draw my chart is only executed once my data is loaded. And placing THAT within the anychart.onDocumentReady() function ensures that THAT code will only be executed once my page is loaded. This is probably the most complicated step so if you are confused at first, don’t feel too bad.
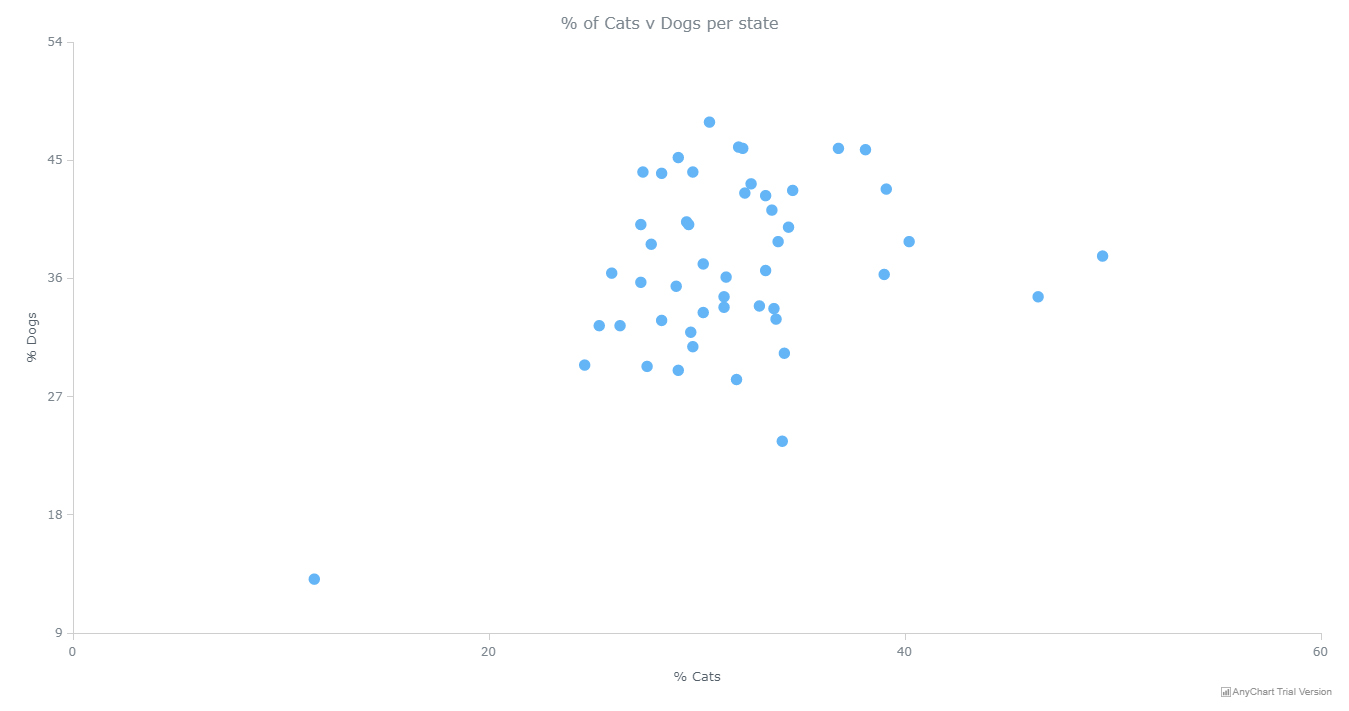
Anychart.scatter() supports three different kinds of plots: bubbles, lines and markers. For now, I will be using markers as these are our standard scatter plot points.
anychart.onDocumentReady(function() {
  anychart.data.loadCsvFile("data.csv", function (data) {
    // create the chart
    chart = anychart.scatter();
    // assign the data to a series
    var series1 = chart.marker(data);
    // set title
    chart.title("% of Cats v Dogs per state");
    // set axes titles
    chart.xAxis().title("% Cats");
    chart.yAxis().title("% Dogs");
    // draw chart
    chart.container("container").draw();
  });
})
which results in:
And that’s it! By following the above four steps I’ve managed to build a fully functioning interactive JavaScript scatter plot. With everything included my code looks like this:
<!DOCTYPE html>
<html>
  <head>
    <title>JavaScript Scatter Chart</title>
    <script src="https://cdn.anychart.com/releases/8.7.1/js/anychart-base.min.js"></script>
    <script src="https://cdn.anychart.com/releases/8.7.1/js/anychart-data-adapter.min.js"></script>
  </head>
  <body>
    <div id="container" style="width: 100%; height: 500px"></div>
    <script>
      anychart.onDocumentReady(function() {
        anychart.data.loadCsvFile("catsvdogs_new.csv", function (data) {
          // create the chart
          chart = anychart.scatter();
          // assign the data to a series
          var series1 = chart.marker(data);
          // set title
          chart.title("% of Cats v Dogs per state");
          // set axes titles
          chart.xAxis().title("% Cats");
          chart.yAxis().title("% Dogs");
          // draw chart
          chart.container("container").draw();
        });
      })
    </script>
  </body>
</html>How to Customize Scatter Chart Appearance
Data Visualizations are all about telling stories and it is the job of the data visualization developer to customize their visualizations to better tell these stories. You may want to make changes to make your chart more engaging, to highlight a particularly interesting aspect of the visualization or to add some functionality to help understand the data better.
All decent charting libraries will come with good customization options to allow you to do this and AnyChart is no different. Using their API allows for a number of different and useful customizations. I’ll try adding a few to get a bit more out of my Cats vs Dogs viz.
Adding grids
Grids are a very useful way of helping users understand your data. You can use xGgrid() and yGgrid() as well as xMinorGrid() and yMinorGrid() to create major and minor grids respectively. You can also customize their styling using the stroke() and palette() methods.
The following code enables both major and minor grid and sets the parameters for their styling.
// enable major grids
chart.xGrid(true);
chart.yGrid(true);
// configure the visual settings of major grids
chart.xGrid().stroke({color: "#212D40", thickness: 0.3});
chart.yGrid().stroke({color: "#212D40", thickness: 0.3});
// enable minor grids
chart.xMinorGrid(true);
chart.yMinorGrid(true);
// configure the visual settings of minor grids
chart.xMinorGrid().stroke({color: "#212D40", thickness: 0.15, dash: 5});
chart.yMinorGrid().stroke({color: "#212D40", thickness: 0.15, dash: 5});
Adding a trend line
Trend lines, lines of best fit, and other lines can be used to aid user analysis of the data. By taking advantage of the supported series of anychart.scatter(), I can easily add a line to my chart.
In my chart I think adding a 45-degree line could be a good idea. It would dissect the chart and would allow someone looking to easily spot whether a state was more of a dog state or a cat state.
In order to add this line I first need to create the data, with one point at the origin and another further along, before assigning this data to a line series.
// add data for line
var data2 = [
  {x: 0, value: 0},
  {x: 60, value: 60}
];
// assign the line data to a line series
var series2 = chart.line(data2);
Which results in my chart looking like this:
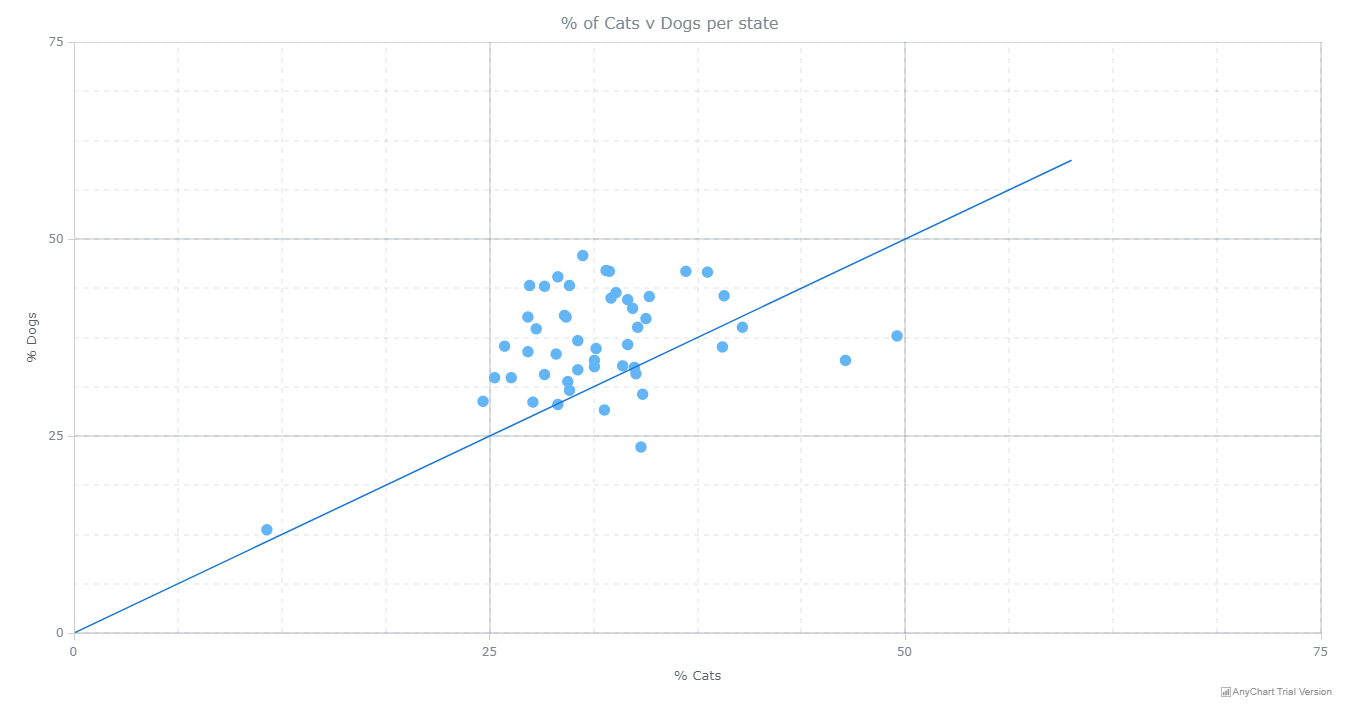
As you can see, there is clearly a bias in the US towards dogs! Can you call the US a dog country? Well I don’t make the rules!
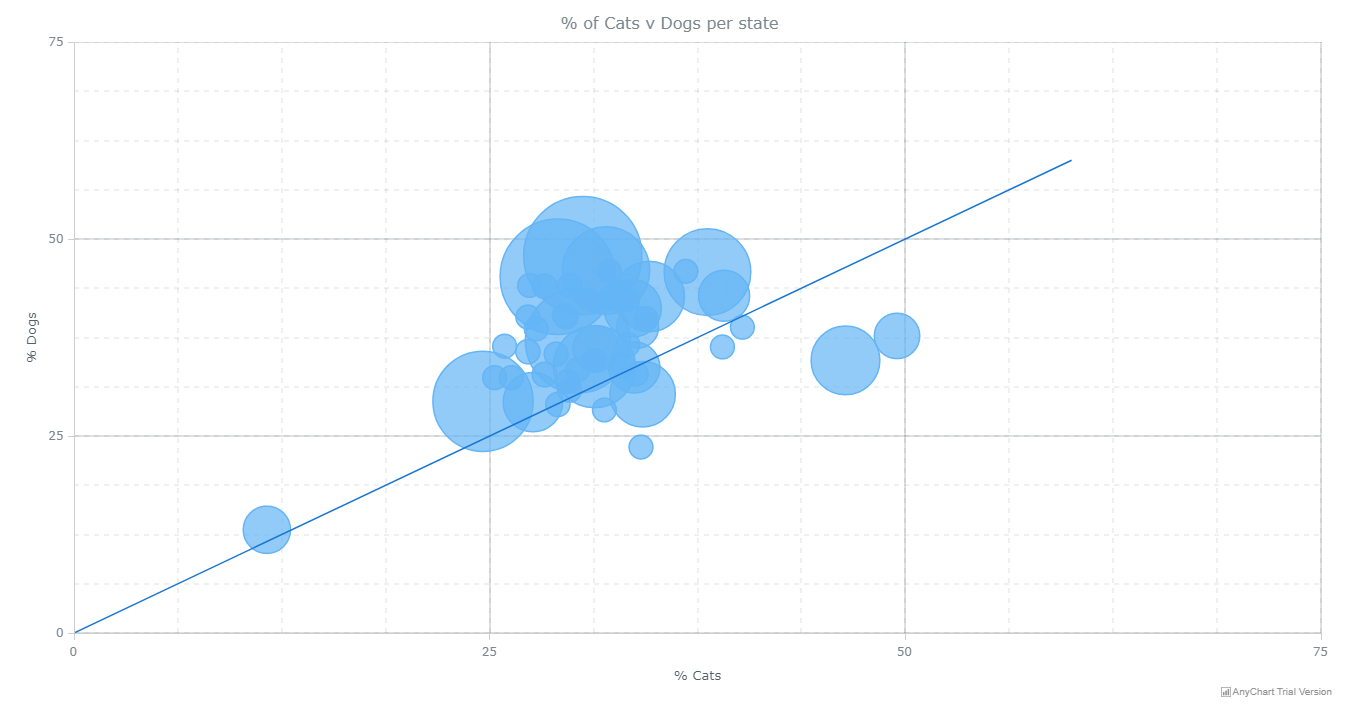
Bubble chart
Scatter plots at default can only support two variables but sometimes it will be necessary to support more. There are a number of ways of extending these charts to do this including having the color of each point be dependent on an additional variable, either a range for numerical variables or distinct for categorical variables or by changing the size of the points depending on this third variable.
By extending scatter plots using the size of the points you are changing a scatter plot into a bubble chart. With the right data these can look really impressive. They’re also easy to implement with the same code I’ve used to make my scatter plot.
I simply change the series from a marker to a bubble. It really is that easy. (I also change the minimum and maximum size of our bubbles to make things a bit less messy).
// assign the data to a series
var series1 = chart.bubble(data);
// adjust bubble min/max size
chart.minBubbleSize("2%");
chart.maxBubbleSize("10%");
which results in this bubble chart:
How easy was that?…
Conclusion
As you now know, making a JavaScript scatter plot is quick and easy! They’re one of the most popular data visualizations and are very useful at exploring the relationships between two variables. In addition, with a bit of work they can easily be extended to show more variables.
The chart I built here is really just scraping the surface of what scatter plots can be. Drop a comment below or hit me up on twitter and I’d be more than happy to send you some examples of my personal favourites!
See next:
- JS scatter plot examples
- JS scatter plot documentation
- More JS charting tutorials
- Categories: AnyChart Charting Component, Big Data, HTML5, JavaScript, JavaScript Chart Tutorials, Tips and Tricks
- 1 Comment »